Blood Knot
The blood knot is one of several fly fishing knots that is used to connect two fishing lines together like a leader and a tippet. The end of a tapered leader is about the same size as a tippet. The
Albright Knot
is better suited for lines of different diameters. The blood knot makes a lot of sense when you build it, but does require some practice to be able to make it smoothly while out fly fishing. If you have not used this knot in a while, practicing before handis a good idea before going fly fishing.
Understanding Knot Terms
There are many terms used when describing tying fishing knots, marine knots, and other types of knots. Two words I will use in the descriptions of my favorite knots will be
The working end is the end of the rope or fishing string that you are actually working with. You are usually not working with both ends of the fishing line. When tying your shoes you are in reality working with both ends of your shoe string so both ends would be considered working ends. With fishing line you normally have one end you are working with and the other end is usually fastened to the arbor, hook or lure. The standing end is the end of the line tied to the arbor. The standing part is the part of the line from the standing end to the knot. Remember these definitions when reviewing how to tie my 10 favorite knots.
Understanding Working End
There are many terms used when describing tying fishing knots, marine knots, and other types of knots. Two words will be used in the descriptions of these knots.
The working end is the end of the rope or fishing string that you are actually working with. You are usually not working with both ends of the fishing line. When tying your shoes you are in reality working with both ends of your shoe string so both ends would be considered working ends. With fishing line you normally have one end you are working with and the other end is usually fastened to the arbor, hook or lure. The standing end is the end of the line tied to the arbor. The standing part is the part of the line from the standing end to the knot. Remember these definitions when reviewing how to tie these 10 common knots.
Tying the Blood Knot
 Blood Knot Step One and Two
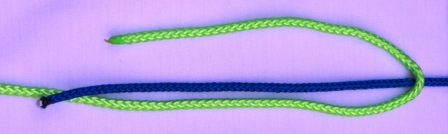
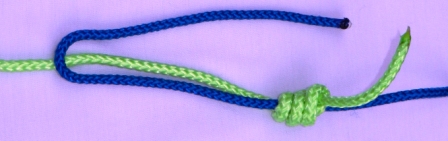
The blood knot actually has two working ends. Lay the two ends of the leader and tippet for example along side of each other. In the field or next to a stream you will have to learn to do this in your hands. Notice in the picture above that this actually shows the second step by looping one working end back towards the second working end.
Blood Knot Step Three
 Blood Knot Step Three
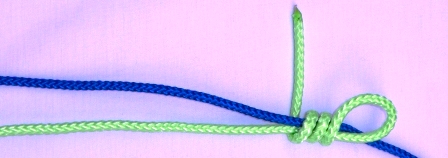
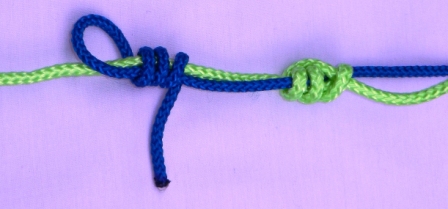
Step Three involves forming 8-10 loops with the working end of the line you just made the loop. As you make these turns or revolutions you will see the loop getting smaller as in the photo above. Keep this loop open by holding it as you make these revolutions. In the example above I shortened this process using only showing 3-4 turns. With a common leader and tippet you should attempt to make 6-10 turns.
Step Four
 Step Four
 Tighten the Knot
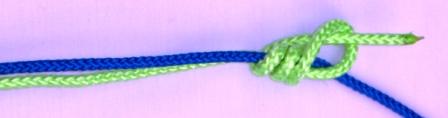
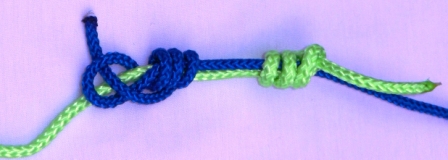
This step completes the first half of this knot. Pass the working end of the line you have been using through the remaining loop you have formed. Then tighten this knot down onto the working end of the other line. Do not let the working end of the second line slip through this knot just formed. The second picture shows this first knot tightened down. What is going to happen is the second working line is going to form a knot just like this one you just formed. Then when you pull the standing parts of both lines these knots will slide together and hold firmly.
We are an Amazon Affiliate. If you
purchase a product we recommend or another product while on Amazon, we may
receive a small commission. Our staff recommends items that we have
personally owned, used/tested, researched or we have fished with trusted anglers
who recommend them. These products will not cost you any more than
what is posted.
Finish the Knot
 Begin Side Two
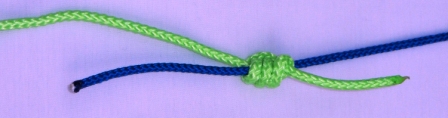
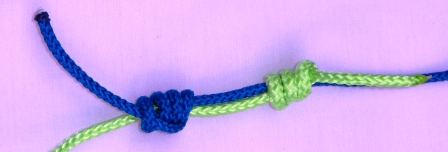
Now begin the same process on the reverse side. Follow these additional pictures showing the final steps to completing this knot. When done, trim the loose ends.
 Side Two Loop Arounds
 Working End Through Loop
 Tighten Second Knot
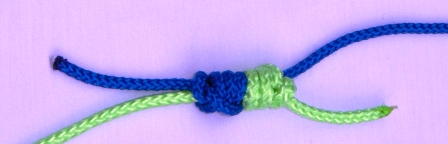 Finish Blood Knot - Pull Together and Trim
