The Arbor Knot
The arbor knot is an essential knot to learn because it is the ideal knot to tie new line onto your fishing reel. This application needs a knot that hugs the arbor snuggly so that when you reel in the line it won't slip. The arbor knot actually closes down tightly onto the arbor, and becomes tighter when you pull on the line.
Use of a more common double
Overhand Knot allows the line to slip around the arbor.
Understanding Knot Terms
There are several terms used when describing tying fishing knots, marine knots, and other types of knots. Two basic terms uses when describing how to tie all knots are:
The working end is the end of the rope or fishing string that you are actually working with. You are usually not working with both ends of the fishing line. When tying your shoes you are in reality working with both ends of your shoe string so both ends would be considered working ends. With fishing line you normally have one end you are working with and the other end is usually fastened to the arbor, hook or lure. The standing end is the end of the line tied to the arbor. The standing part is the part of the line from the standing end to the knot. Remember these definitions when reviewing how to tie 10 favorite knots.
The Arbor Knot
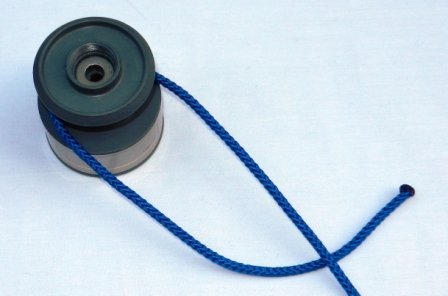 Arbor Knot Step One
When attaching fishing line to fishing reels keep in mind how you are going to wind the line onto the reel. If doing it manually (most often this is the case when done at home) you will need to feed the line onto the reel in the manner it comes off the reel and to the fishing pole itself. You will want to open the bail on a spinning reel. You will want to feed the line through the line guide of a bait casting reel. After doing this feed the working end of the fishing line around the arbor of your reel and then lay over top of the standing part of the line as in the picture above.
Arbor Knot - Step Two
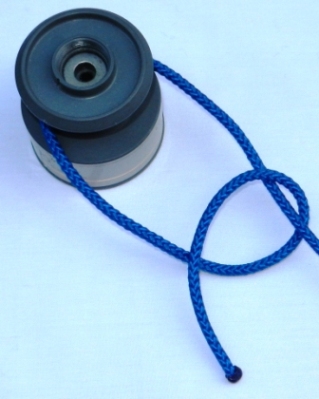 Arbor Knot Step Two
After looping the working end under the standing part, form an actual loop by passing the working end over the top of the standing part and over the working end that is coming from the other side of the arbor. You will not have to keep this loop very long as you will very quickly move to the third step.
Step Three
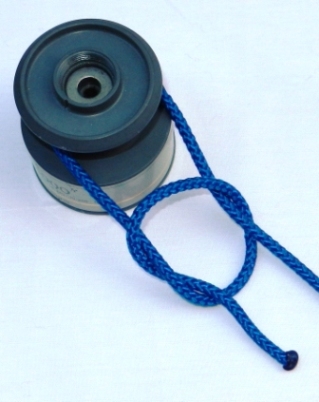 Arbor Knot Step Three
This knot is really taking shape now. Pass the working end one time around the loop that you formed in step one. Pull the working end out and away from the loop far enough to make an overhand knot near the end of the fishing line.
Step Four
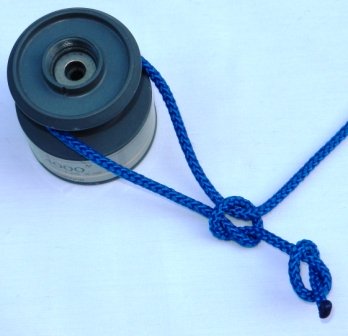 Step Four
Step four is the next to last step before tightening this knot down onto the arbor. Form an overhand knot as close as possible to the working end of the fishing line. Tighten this overhand knot. You are now ready to tighten the loop formed in steps 2-3. Pull the standing end of the fishing line and the knot will slide tightly against the arbor. This knot will hug the arbor and resist slippage. The overhand knot made in step four will slide against the knot made in steps 2 and 3 acting as a lock to keep the whole knot from coming apart.
Final Step
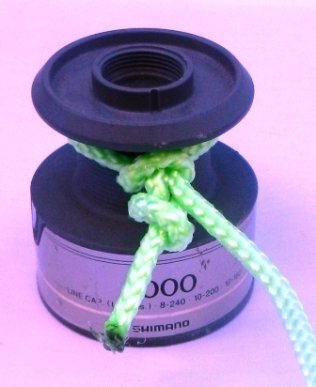 Final Step - Tighten
The final step is to finish the knot. Any final tightening, and trimming of any excess line can be done now. Shown in this final picture is the knot made with a green rope for better viewing. Remember using a typical fishing line these knots will be very small, and with the stretch of line will tightly hug the arbor and be out of the way for spooling the reel.