Rapala Knot
The loop formed by the Rapala knot when attached to a fishing lure allows the lure the most freedom to move, wiggle, dive - in other words to do what it has been designed to do. You will find instructions how to tie this knot in every Rapala Lure you purchase. Staff at PFT have used many Rapala Lures over the years and recommend you check them out at the advertisers on this site. Many game fish will hit these lures inclkuding great success in Canada for Walleye with the Rapala Deep Tail Dancer in Purple Flash and Bleeding Tiger.
Understanding Knot Terms
There are many terms used when describing tying fishing knots, marine knots, and other types of knots. Two words used in the descriptions of our favorite knots will be- Standing End
- Working End
The Working End
When beginning to learn to tie fishing knots, you will need to learn to leave enough extra line on your working end to finish the knot. With practice you will learn to estimate this very closely. As you progress through tying the knot you will quickly learn to tell if you will run out of line on your working end. Sometimes you will need to just start over because you will not have started with enough extra line on the working end to finish the knot. The rope used in these pictures is of course much bigger than fishing line - as a result the knots in these pictures are much bigger than you will make with your fishing line.. When done tying any knot trim any excess line on the working end so that it will not be in the way.
Tying The Rapala Knot: Step One
 Rapala Knot Step One
The first step in making the Rapala Knot is to form an overhand knot a few inches from the working end of your line. Do not tighten this overhand knot at this time, leave a small loop exposed. The picture does not show enough working end line, you will see what I mean in the next picture. You need this length to finish the Rapala Knot. Your next step you will be passing the working end through the eye of your lure.
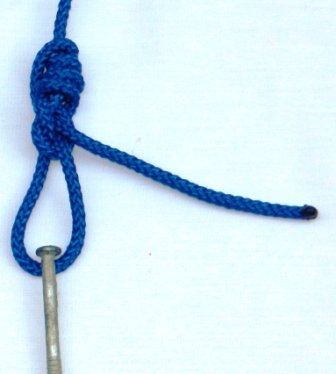
Rapala Knot - Step Two
 Rapala Knot Step Two
Step two in making this knot is to pass the working end of your line through the eye of your lure. Shown in the picture is a nail head where your lure eye should be. It is important that your working end now pass back through the loop you left in the overhand knot. Notice that if your working end passes under the line as it comes out of the overhand knot you should pass the working end over the top of the line that forms the loop of the overhand knot. Do not tighten your overhand knot yet. You will continue to need plenty of line to work with, note the excess working end line in this picture.
Rapala Knot - Step Three
 Rapala Knot Step Three
 Step three of making this knot requires you to pass the working end over the top and around the standing end of the rope close to the overhand knot. This begins a circling process you will see in the next step and picture where you will make 3-4 passes around the standing part of the line.
Rapala Knot - Step Four
Step FourStep Four is the making of additional passes around the standing part of the line so that you end up with 4 loops or rings around. Note in the picture the working end now has about 1-2 inches left exposed. This is important because in the final step you will pass this working end through the eye or loop of your overhand knot to lock the knot in place.
Step Five
 Step Five - Final Step
 In step five, your final step you will pass the working end over the top of the standing part and then under then through the eye, or loop, that remains in your overhand knot. Holding this working end and your lure begin to tighten the knot. Pull the working end tight against the overhand knot. Tighten the overhand knot by pulling on the standing part against the loop formed that passes through the eye of your lure. Your knot should look like the following:
 Final Knot
As an Amazon Associate, we earn from qualifying purchases. Items we reference and recommend have been personally owned, used and tested or we have fished with anglers who were using them.
Knot Resource Guide
Here is a great resource for your pocket, tackle box or boat. You will likely learn to tie many of these knots from memory, but having this resource available often will come in handy. Click on the link below.
